Introduction:
Are you tired of seeing the “Your connection is not private” warning? Or perhaps you are looking to have full control over your internal digital certificates? If so, then this guide is for you. Public Key Infrastructure (PKI) is the backbone of secure communication over the internet, which ensures that the transmission of data is encrypted between servers and clients.
In this step-by-step guide, we’ll walk you through you building a Custom Certificate Authority (CA) and configure HTTPS on an Apache web server. This complete process gives you a full control over your internal certificates, which will ensure that your communication is secure within the internal applications, test environments, and even IoT devices—all without relying on the public Certificate Authorities.
Why Building Your Own Custom PKI is a Game-Changer
While public CAs like Let’s Encrypt are excellent in securing the public-facing websites, however, having a custom, internal CA provides an unparalleled control over the security of an organization. A custom PKI allows you to issue certificates for your internal servers, applications, and IoT devices inside the controlled and secure environment.
Building your own PKI has multiple benefits:
- Security and Privacy: With a custom CA, you have a complete control on your certificates and their lifecycle.
- Internal Authentication: You can use it to secure your private network segments and implement a robust internal authentication mechanism.
- Cost-Effective: you need not to purchase certificates from a third-party CA for your internal applications, which saves you, its costs.
- Full Lifecycle Management: From generation and signing to renewal, you have full control on every aspect of certificate management to ensure that your internal devices and servers are always secure.
Whether you need PKI for enterprise environments, private applications, or sensitive IoT systems, custom PKI provides a scalable, cost-effective, and secure solution.
The Lab Setup: Tools and Virtual Environment
In this lab, we are going to use the following tools and versions of software to ensure their compatibility and a replicable setup:
- Ubuntu Server 22.04 LTS: It will be the foundation for both the Certificate Authority (CA) and the web server VMs.
- OpenSSL 3.0: It will be used to generate RSA keys and X.509 certificates.
- Apache/2.4.52 (Ubuntu): It will be configured to support HTTPS.
- VMware Workstation: For course, to manage and run the virtual environments.
By specifying the versions used, we ensure compatibility and give readers a precise, accurate setup to replicate.
Step-by-Step Guide: Building Your PKI and HTTPS Web Server
Step 1: Establishing Your Certificate Authority (CA) VM
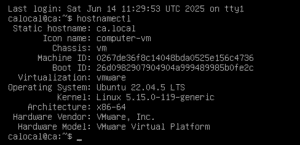
We began with the configuration of the Certificate Authority (CA) on a dedicated VM (hostname: ca.local). The role of this VM is to generate and sign the certificates which will be used for HTTPS communication on your web server.
To set the static hostname, we used the following command:
hostnamectl set-hostname ca.local
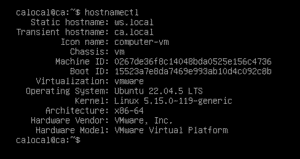
Step 2: Preparing the Web Server Environment
To streamline this process, we have cloned the CA VM to create the new web server (ws.local). This has saved time on installation and made the HTTPS setup smoother. This ws.local VM is configured with a unique IP address and hostname, to interact with the CA for signing the certificate.
Step 3: Configuring Your Custom Certificate Authority with OpenSSL
Now to generate the RSA private key and the self-signed certificate for the CA, we have to used OpenSSL 3.0 with the -x509 flag. The -x509 flag creates a self-signed certificate directly from the private key. This certificate is used to sign other certificates, so that the initiated certificates can be trusted by clients. The following command was used to generate the RSA private key with a key size of 4096 bits (for enhanced security):
openssl genpkey -algorithm RSA -out ca.key -pkeyopt rsa_keygen_bits:4096
openssl req -key ca.key -new -x509 -out ca.crt
-x509: Creates a self-signed certificate.pkeyopt rsa_keygen_bits:4096: Ensures a secure 4096-bit RSA key for enhanced encryption.
Step 4: Generating CSR and CA Signing
On the web server VM, we generated a Certificate Signing Request (CSR) using OpenSSL. This CSR was then transferred to the CA VM for signing, producing a valid server certificate for HTTPS.
Here’s the command to generate the CSR:
openssl req -new -key ws.key -out ws.csr
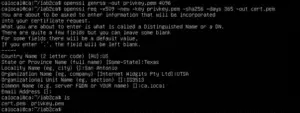
We then transferred the CSR to the CA VM and signed it using the following command, which includes the -CAcreateserial flag:
openssl x509 -req -in ws.csr -CA ca.crt -CAkey ca.key -CAcreateserial -out ws.crt
-CAcreateserial: This ensures OpenSSL generates a unique serial number for each certificate, which is essential for tracking and managing issued certificates.
Figure 4: CSR Creation on Web Server Screenshot (Alt text: OpenSSL CSR file created and transferred for signing on the CA VM.)
Checkpoint 5: Configuring Apache for HTTPS
To enable HTTPS on Apache2, we updated the default-ssl.conf file to point to the correct certificate and key files:
SSLCertificateFile /etc/ssl/certs/ws.crt
SSLCertificateKeyFile /etc/ssl/private/ws.key
Before starting Apache, ensure that the SSL module is enabled, and the default SSL site is activated:
sudo a2enmod ssl
sudo a2ensite default-ssl
sudo systemctl restart apache2
These commands ensure Apache2 is set up to handle SSL/TLS traffic securely.
Figure 5: Apache SSL Configuration Screenshot (Alt text: Apache configuration file edited to enable SSL certificates and restart Apache.)
Checkpoint 6: Establishing Browser Trust by Importing CA Certificate
To fix the “Your connection is not private” warning in browsers, we imported the CA certificate into the trusted root store of the browser. This ensures the server’s SSL/TLS certificate is trusted by the browser.
We also edited the hosts file to map the IP to ws.local, allowing smoother connection to the server:
192.168.100.168 ws.local
For Chrome users, clear HSTS settings by navigating to:
chrome://net-internals/#hsts
Delete any domain security policies for ws.local and re-import the CA certificate. This step resolves HSTS caching issues and ensures the browser trusts the custom CA.
Figure 6: Import CA Certificate into Browser Screenshot (Alt text: Screenshot showing the process of importing the CA certificate into the browser’s trusted root store.)
Overcoming Common Challenges: HSTS Caching
One common challenge faced during this lab was HSTS caching. After clearing the browser’s HSTS settings and re-importing the CA certificate, the issue was resolved. HSTS caching can prevent browsers from trusting the custom CA even after the certificate is installed. Clearing the HSTS settings ensures the browser correctly recognizes the custom CA and establishes a secure connection.
Conclusion: Validating Secure Communication
After completing all the steps, we successfully set up a secure HTTPS connection with our custom CA. To confirm this, we examined the certificate details in the browser, ensuring the correct server certificate was being used. We also validated the connection using openssl s_client:
openssl s_client -connect ws.local:443
This step confirmed the server’s SSL certificate was correctly issued and trusted, and we saw the padlock icon in the browser.
Further Reading / Resources:
For those looking to expand their knowledge on PKI and Apache SSL/TLS configurations, check out these resources:
- OpenSSL Documentation: OpenSSL.org
- Apache HTTP Server SSL/TLS Configuration: Apache SSL Docs
- Chrome HSTS Settings: Chrome HSTS Settings
- Ubuntu Documentation: Ubuntu Help
What’s Next?
Now that you’ve set up a basic PKI, consider exploring more advanced topics to further enhance your security infrastructure:
- Certificate Revocation: Crucial for invalidating compromised certificates and maintaining a strong security posture.
- Automating Certificate Renewals: Using SCEP or ACME to prevent certificate expiry outages and streamline operations.
- Integrating PKI with Active Directory: For centralized user and device authentication within enterprise networks.
Call to Action (CTA):
Have you ever worked with custom PKI setups? Share your experiences and challenges in the comments below—let’s discuss best practices for securing internal communication! Don’t forget to subscribe for more hands-on cybersecurity guides and in-depth tutorials!
Additional SEO Considerations:
- Internal Links: Add internal links to any other relevant blog posts you have, such as on asymmetric cryptography, SSL/TLS basics, or Apache web server setup.
- Long-Tail Keywords: Integrated keywords like “how to build a custom certificate authority,” “Apache SSL configuration,” and “import CA certificate into browser” will help improve SEO ranking.
- Schema Markup: Use HowTo schema for the step-by-step guide, which will allow Google to display rich snippets in search results.
With these adjustments, your blog is now optimized to rank well in search engines, providing both technical depth and clarity to readers. You’ve added rich content, enhanced SEO and user experience, and improved your content’s accessibility.